Final Fantasy 7 Rebirth Protorelic locations
The elusive Protorelic in Final Fantasy 7 Rebirth can be found across seven regions, and to collect all pieces and complete the quest, players must also acquire every Summon. This quest can be quite extensive, so we’ve detailed all Protorelic locations in Final Fantasy 7 Rebirth, along with precise instructions on how to unlock all Protorelics, including those found in Corel, Gongaga, Cosmo Canyon, and Nibel.
Be aware that the explainer section at the bottom of this guide contains spoilers regarding the conclusion of the Protorelic quest!
For additional assistance during your adventures across Gaia, explore our guides on dating Tifa, locating all Piano Sheets, and understanding the game’s ending.
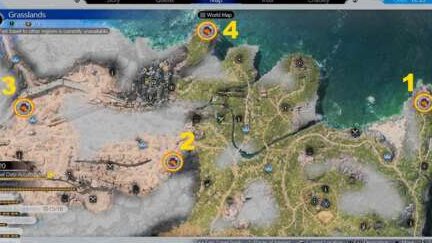
Final Fantasy 7 Rebirth Grasslands Protorelic location
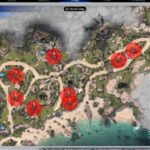
The Grasslands area initiates the first Protorelic quest chain, also known as Phenomenon Intel. This Protorelic is situated at the northeastern tip, north of Titan Sanctuary A. Progressing through the story in Chapter 2 will reveal its location on your map.
This quest comprises four stages, each marked on your map after completing the previous one. If you require assistance during the final quest, guidance is available for waking up the dead businessmen.
Final Fantasy 7 Rebirth Junon Protorelic location
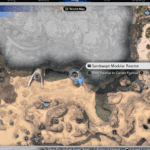
The Junon Protorelic can be found at the southern tip, south of the Mythril Mine, positioned between two Remnawave Towers and east of a Junon Chocobo Stop.
To unlock the Junon Protorelic quest, activating the Seabreeze Remnawave Tower by the Chocobo Ranch was necessary. However, you might be able to activate any Remnawave Tower in Junon to mark the location on your map.
For additional help with the Junon Protorelic quest, consider looking at guides regarding Fort Condor.
Final Fantasy 7 Rebirth Corel Protorelic location
The Corel Protorelic quest requires some time to complete. The first location is unlocked after traveling to the southern section of Corel in Chapter 9, following the initial visit to the Gold Saucer. You must wait until the end of Chapter 12 to finish the final two parts of this quest.
The first Corel Protorelic location is found in the northwestern corner of the southern section, just below the Gold Saucer. Activating the nearby Wasteland Remnawave Tower will help mark the Protorelic’s location on your map, but any Remnawave Tower in this section of Corel should suffice.
While waiting for the end of Chapter 12, you can complete Protorelic quests in other regions.
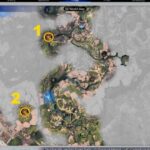
Final Fantasy 7 Rebirth Gongaga Protorelic location
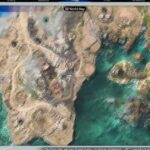
To find the Gongaga Protorelic, head south of Gongaga village and west of the reactor visited during the story. The location is just below the Mogstool and near a designated photo opportunity.
The first Remnawave Tower activated – Midriver Isle – marked the Gongaga Protorelic’s quest location on the map. Other Remnawave Towers in Gongaga might also work for this purpose.
Final Fantasy 7 Rebirth Cosmo Canyon Protorelic location
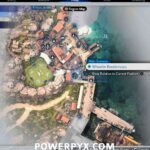
The Cosmo Canyon Protorelic is situated in the southwestern part of Cosmo Canyon, southeast of the Crimson Earth Remnawave Tower and a scenic photo location. To unlock this quest, players need to continue through the story in Chapter 10, as it is not accessible from the outset.
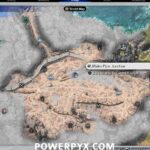
Final Fantasy 7 Rebirth Nibel Protorelic location
The Nibel Protorelic can be found right next to the Gull Bridge Remnawave Tower in the northern area of Nibel, directly east of the airstrip and just northwest of a Mogstool. Progressing through the story in Chapter 11 is necessary to reveal the Nibelheim Protorelic’s location on your map.
This quest is the last one that can be done out of sequence, as completing all previous Protorelic quests is required to unlock the final location.
Final Fantasy 7 Rebirth Meridian Ocean Protorelic location
The last Protorelic is located in the Meridian Ocean, which becomes accessible at the beginning of Chapter 12. It is situated between Costa Del Sol and Junon as you travel north.
To unlock the final locations in Meridian Ocean, you need to begin Chapter 13, complete all other Protorelic quests, acquire every Summon, and locate all of their Summon Shrines. Only then can you embark on the final Protorelic quest. Keep reading for more information on this ultimate challenge.
Final Fantasy 7 Rebirth Protorelic explained
Stop reading now if you wish to avoid spoilers!
There are six standard Protorelic quest chains in Final Fantasy 7 Rebirth. Upon completing them and acquiring every Summon at full strength, players can take on the last two Protorelic challenges: battling all Summons and then Gilgamesh. This requires getting Titan, Phoenix, Alexander, Kujata, Bahamut Arisen, and Odin in the Combat Simulator, alongside finding all Summon Shrines and finishing every other Protorelic quest.
Prepare for the battles that lie ahead, as the Summons prior to Gilgamesh are fought in pairs: Titan and Bahamut Arisen, Phoenix and Kujata, followed by Alexander and Odin.
When facing Gilgamesh in the final encounter, it’s advisable to bring Fire and Bio Materia to exploit its elemental weaknesses.
Good luck completing the Protorelic quest in Final Fantasy 7 Rebirth!
Related posts:
 Final Fantasy 7 Rebirth Hidden Cactuar locations
 All Summon Crystal locations in Final Fantasy 7 Rebirth
 All Cosmo Canyon Cache locations in Final Fantasy 7 Rebirth
 All Cosmo Canyon Chocobo Stop locations in Final Fantasy 7 Rebirth
 Final Fantasy 7 Rebirth Seventh Infantry locations
 Final Fantasy 7 Rebirth feed for Piko locations
 Best weapons and locations in Final Fantasy 7 Rebirth
 Final Fantasy 7 Rebirth zipline locations
 All Junon Cache locations in Final Fantasy 7 Rebirth
 All Corel Cache locations in Final Fantasy 7 Rebirth
 All Wheelie locations in Final Fantasy 7 Rebirth
 Square Enix admits Final Fantasy 7 Rebirth and Final Fantasy 16 profits “did not meet expectations”


Post Comment