Final Fantasy 7 Rebirth Fort Condor guide
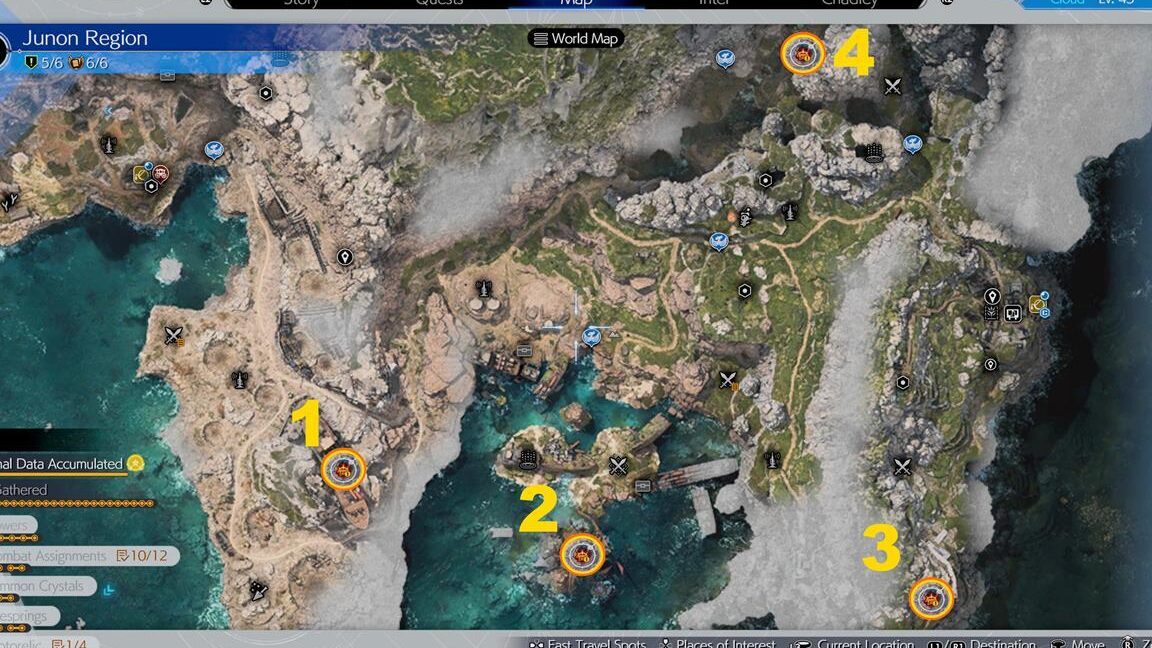
Fort Condor is an engaging minigame featured in Final Fantasy 7 Rebirth, essential for acquiring the Protorelic in Junon. While it may appear straightforward, this tower defense-inspired game requires strategic thinking to navigate through its challenging stages. This guide provides detailed solutions for every Fort Condor match across Stage 1, Stage 2, Stage 3, and Stage 4, including tips on conquering hard mode for each stage.
For additional support throughout your journey in Gaia, explore guides on Chocobo Stops, Moogle Medals, and Golden Plumes.
Fort Condor Rules Explained
Fort Condor is a strategic board game where Cloud, Tifa, and Barret find themselves transformed into polygonal versions reminiscent of their original designs. Your objective in Fort Condor is to destroy the enemy’s boss unit within a time limit while protecting your own base. Although you can eliminate the enemy’s outposts, your primary target is their headquarters; losing it results in defeat.
The Basics
Each stage features a unique boss with distinct attack patterns, adding complexity to the gameplay. Successful strategies involve deploying troops effectively to reach and defeat the boss while defending your headquarters.
Ally and Enemy Troops
Defeating the enemy’s boss requires deploying Condor Troops, categorized into three types: red (Vanguard), green (Ranged), and blue (Defense). Your opponent will deploy their own troops with the same classifications. To gain an advantage, deploy your troops strategically based on their strengths against the enemy’s forces.
Clerics can heal nearby allies and cast ranged attacks, while ballistas and trebuchets serve as defensive structures, damaging enemies and blocking paths. Each unit has an ATB cost that fills over time, determining when you can deploy them.
Enemy Type Chart
Strengths and weaknesses follow a rock-paper-scissors rule, summarized below:
- Defense (blue) is weak to Ranged (green).
- Ranged (green) is weak to Vanguard (red).
- Vanguard (red) is weak to Defense (blue).
Hero Units
Alongside standard troop types, you can deploy Hero Units: Cloud (Defense), Tifa (Vanguard), and Barret (Ranged). Their deployment relies on filling their specific bars through deploying corresponding troop types. Hero Units deliver powerful attacks upon deployment, making them crucial in battles.
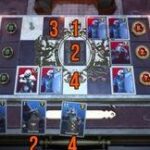
Formations
Choosing the right formation before each match is vital. Different formations offer unique troop combinations and strategies, allowing for tailored approaches to each stage. The formations impact your overall tactics, so select wisely based on the challenges ahead.
Final Fantasy 7 Rebirth Fort Condor Stage Guides
Stage 1 Guide
Hero Units – Cloud and Barret.
Formation – Assault: Offense Focused.
- Deploy a regular Enforcer to the right path.
- Deploy an Elite Vanguard to the left path.
- Place a trebuchet outside your base between the two paths.
- Deploy an Elite Ranger behind the Enforcer on the right path.
- Deploy a Cleric to the right of the trebuchet.
- Deploy an ordinary Vanguard behind the Elite Vanguard on the left path.
- Deploy a Cleric behind the Enforcers when they reach the boss.
- Deploy another Elite Vanguard at the boss.
Stage 2 Guide
Hero Units – Cloud and Barret.
Formation – Safeguard: Defense Focused.
- Deploy an Elite Enforcer to the right path.
- Deploy a Cleric behind the Elite Enforcer.
- Deploy a regular Enforcer behind the Cleric.
- Deploy an Elite Vanguard to the left path.
- Deploy a Cleric behind the Elite Vanguard on the left path.
- Place a ballista at the right entrance to block it.
- Deploy a regular Enforcer on the right side of your base when the ballista is destroyed.
- Deploy a Cleric behind the regular Enforcer on the right side.
- Deploy an Elite Ranger on the left side to eliminate enemies.
- Deploy an Elite Vanguard to the left path.
- Deploy a regular Enforcer to the left path.
- Deploy Cloud on the left path to eliminate enemies.
- Deploy an Elite Vanguard and Ranger behind Cloud.
- Deploy Barret at the boss.
Stage 3 Guide
Hero Units – Cloud and Tifa.
Formation – Assault: Offense Focused.
- Deploy an Elite Vanguard to the right path.
- Deploy a regular Vanguard to the left path.
- Place a trebuchet outside your base, between the two paths.
- Deploy a Cleric behind the Elite Vanguard on the right path.
- Deploy a Cleric on the left path.
- Deploy a regular Vanguard on the right path.
- Deploy a regular Enforcer if the monster reaches your base.
- Deploy a trebuchet on the left entrance to block it.
- Deploy additional regular Vanguards and Rangers as needed.
- Deploy Cloud on the left side to eliminate enemies.
- Deploy Tifa at the boss when possible.
Stage 4 Guide
Hero Units – Cloud and Tifa.
Formation – Assault: Offense Focused.
- Deploy a regular Enforcer to the right path.
- Deploy a Cleric behind the Enforcer.
- Place a trebuchet outside your base, between the two paths.
- Deploy regular Rangers on the left path.
- Deploy multiple regular Rangers behind the Cleric on the right path.
- Deploy another trebuchet to the left of the first one.
- Continue deploying units to fend off enemies and protect the trebuchets.
- Deploy Cloud to eliminate enemies on the right path.
- Deploy Tifa at the boss to secure a swift finish.
Final Fantasy 7 Rebirth Fort Condor Hard Mode Guides
Stage 1 Hard Mode Guide
Hero Units – Barret and Tifa.
Formation – Entrench: Stronghold Defense Focused.
- Deploy a regular Enforcer to the right path.
- Deploy a Cleric behind the Enforcer.
- Place a trebuchet outside your base, between the two paths.
- Deploy a Ranger to the left path.
- Deploy a Cleric behind the Ranger on the left path.
- Deploy a ballista on the left path to block the entrance.
- Deploy regular Vanguards to protect the trebuchet.
- Deploy Barret on the right path.
- Deploy Tifa on the left path inside your base.
- Protect the trebuchet until the boss is defeated.
Stage 2 Hard Mode Guide
Hero Units – Barret and Tifa.
Formation – Balanced: Offense and Defense Focused.
- Deploy an Elite Enforcer to the right path.
- Deploy a Cleric behind the Elite Enforcer.
- Deploy regular Vanguards and Rangers as needed on the right path.
- Deploy Barret to support the right path.
- Deploy Tifa on the left path to eliminate enemies.
- Keep deploying regular troops until the boss is defeated.
Stage 3 Hard Mode Guide
Hero Units – Barret and Tifa.
Formation – Assault: Offense Focused.
- Deploy an Elite Vanguard to the right path.
- Deploy Clerics and regular Vanguards strategically.
- Place multiple trebuchets for effective range.
- Deploy Tifa on the middle-right side to eliminate threats.
- Deploy Barret to finish off the boss.
Stage 4 Hard Mode Guide
Hero Units – Cloud and Barret.
Formation – Assault: Offense Focused.
- Deploy an Elite Ranger on the right path.
- Deploy Clerics and Enforcers strategically.
- Place multiple trebuchets to maximize damage.
- Deploy Cloud to eliminate threats effectively.
- Deploy Barret at the boss to ensure a quick victory.
Fort Condor Rewards
Completing the Fort Condor minigame grants the Protorelic, leading to a mysterious cutscene featuring the eccentric swordsman. However, there are no additional rewards for conquering hard mode beyond the enjoyment of the challenge.
Related posts:
 Square Enix admits Final Fantasy 7 Rebirth and Final Fantasy 16 profits “did not meet expectations”
 Final Fantasy 7 Rebirth Tifa romance guide
 Final Fantasy 7 Rebirth Aerith romance guide
 Final Fantasy 7 Rebirth Card Carnival puzzle solutions
 Final Fantasy 7 Rebirth “underperforming”, says industry analyst
 Final Fantasy 7 Rebirth gets new patch to fix performance mode
 Final Fantasy 7 Rebirth patch will fix “very scary” lighting on some characters’ faces
 Best Armor in Final Fantasy 7 Rebirth
 Final Fantasy 7 Rebirth ending and Aerith’s fate explained
 Final Fantasy 7 Rebirth tech review: an excellent but inconsistent experience
 Best weapons and locations in Final Fantasy 7 Rebirth
 Final Fantasy 7 Rebirth Stuck in a Rut walkthrough


Post Comment