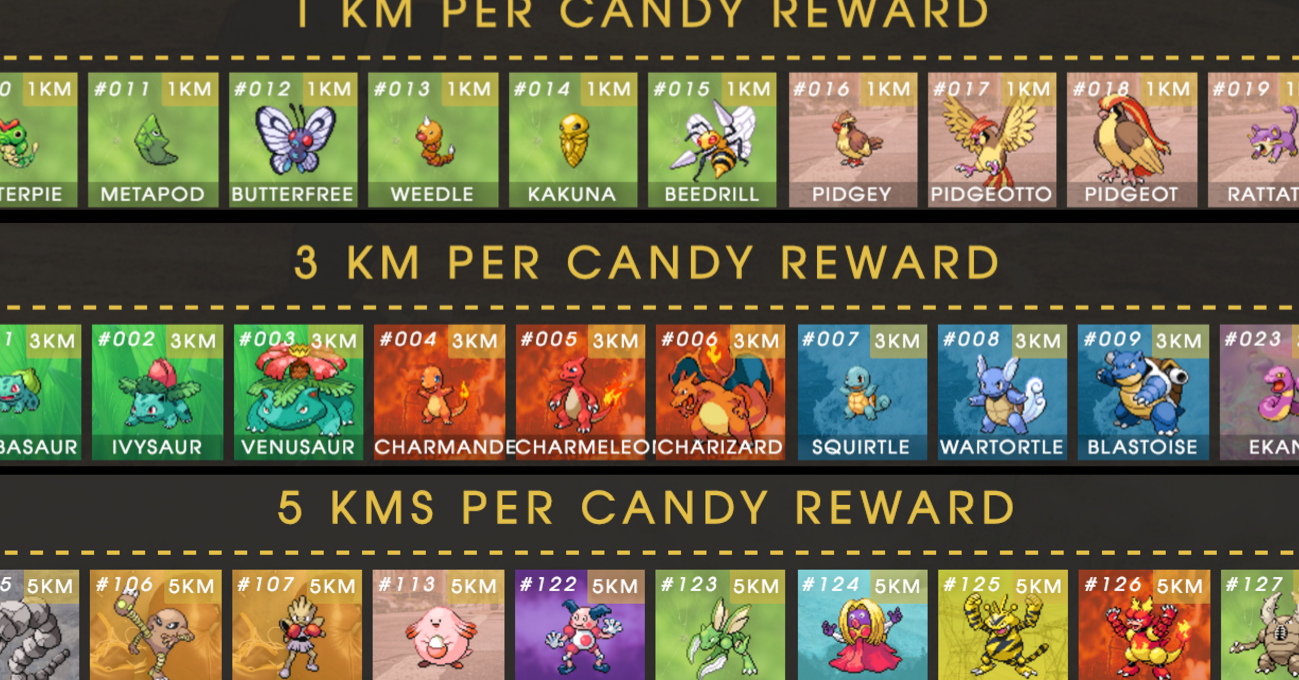
Pokémon Go Buddy distance chart for when Buddy Pokémon drop rewards
Pokémon Go Buddy Distances are essential for determining which Buddy Pokémon to accompany you as you explore the world to earn some extra Candy. Just like Egg hatching, this feature provides a background activity that rewards you after walking set distances with your chosen Buddy Pokémon.
The rewards vary depending on the Pokémon you choose to Buddy up with; rarer Pokémon generally take longer to yield Candy. Additionally, there are specific nuances and exceptions to consider within the Buddy system.
Buddy distances also influence the cost of unlocking a second move for your Pokémon, with longer distances requiring higher costs. Here’s what you need to know:
Why Pokémon Go’s Buddy Feature is Useful
To utilize the Buddy feature, tap your Trainer icon, select the menu icon for more options, and find the Buddy option listed there. After selecting a Pokémon, you will be given a distance goal to achieve. Upon reaching this target—be it 1km, 3km, or 5km—you’ll receive Candy as a reward.
The Buddy system is particularly beneficial for late-game activities such as powering up Pokémon for Gym battles and evolving creatures in your Pokédex. Since catching Pokémon in the wild or hatching them from Eggs can be challenging, the Buddy system provides a reliable method to accumulate Candy. For instance, if you catch a Dratini, walking with it as your Buddy will eventually help you evolve it into the elusive Dragonite.
Although you might only receive 1-2 Candy for every 5km walked, this method can prove advantageous over time.
1km Buddy Distance Chart
Gen 1:
- Caterpie
- Metapod
- Butterfree
- Weedle
- Kakuna
- Beedrill
- Pidgey
- Pidgeotto
- Pidgeot
- Rattata
- Raticate
- Spearow
- Fearow
- Pikachu
- Raichu
- Clefairy
- Clefable
- Jigglypuff
- Wigglytuff
- Zubat
- Golbat
- Geodude
- Graveler
- Golem
- Magikarp
- Gyarados
Gen 2:
- Sentret
- Furret
- Hoothoot
- Noctowl
- Ledyba
- Ledian
- Spinarak
- Ariados
- Crobat
- Pichu
- Cleffa
- Igglybuff
- Slugma
- Magcargo
- Remoraid
- Octillery
Gen 3:
- Poochyena
- Mightyena
- Zigzagoon
- Linoone
- Wurmple
- Silcoon
- Beautifly
- Cascoon
- Dustox
- Taillow
- Swellow
- Surskit
- Masquerain
- Whismur
- Loudred
- Exploud
- Aron
- Lairon
- Aggron
- Gulpin
- Swalot
- Wailmer
- Wailord
- Spoink
- Grumpig
- Swablu
- Altaria
- Barboach
- Whiscash
Gen 4:
- Starly
- Staravia
- Staraptor
- Bidoof
- Bibarel
- Kriketot
- Kricketune
- Burmy (any cloak)
- Wormadam (any cloak)
- Mothim
- Cherubi (both Overcast and Sunny forms)
- Cherrim
Gen 5:
- Patrat
- Watchog
- Lillipup
- Herdier
- Stoutland
- Purrloin
- Liepard
- Pidove
- Tranquil
- Unfezant
- Woobat
- Swoobat
- Sewaddle
- Swadloon
- Leavanny
- Venipede
- Whirlipede
- Scolipede
- Cottonee
- Whimsicott
- Petilil
- Lilligant
- Basculin (both Red and Blue-striped forms)
- Maractus
- Dwebble
- Crustle
- Emolga
- Tynamo
- Eelektrik
- Eelektross
Gen 6:
- Bunnelby
- Diggersby
- Fletchling
- Fletchinder
- Talonflame
- Scatterbug
- Spewpa
- Vivillon
Gen 7:
- Pikipek
- Trumbeak
- Toucannon
- Yungoos
- Gumshoos
- Grubbin
- Charjabug
- Vikavolt
- Cutiefly
- Ribombee
- Stufful
- Bewear
- Wimpod
- Golisopod
Gen 8:
- Skwovet
- Greedent
- Obstagoon
Gen 9:
- Lechonk
- Oinkologne
- Nymble
- Lokix
- Tandemaus
- Maushold
- Tadbulb
- Bellibolt
3km Buddy Distance Chart
Gen 1:
- Bulbasaur
- Ivysaur
- Venusaur
- Charmander
- Charmeleon
- Charizard
- Squirtle
- Wartortle
- Blastoise
- Ekans
- Arbok
- Sandshrew
- Sandslash
- Nidoran (female)
- Nidorina
- Nidoqueen
- Nidoran (male)
- Nidorino
- Nidoking
- Vulpix
- Ninetales
- Oddish
- Gloom
- Vileplume
- Paras
- Parasect
- Venonat
- Venomoth
- Diglett
- Dugtrio
- Meowth
- Persian
- Psyduck
- Golduck
- Mankey
- Primeape
- Growlithe
- Arcanine
- Poliwag
- Poliwhirl
- Poliwrath
- Abra
- Kadabra
- Alakazam
- Machop
- Machoke
- Machamp
- Bellsprout
- Weepinbell
- Victreebel
- Tentacool
- Tentacruel
- Ponyta
- Rapidash
- Slowpoke
- Slowbro
- Magnemite
- Magneton
- Doduo
- Dodrio
- Seel
- Dewgong
- Grimer
- Muk
- Shellder
- Cloyster
- Gastly
- Haunter
- Gengar
- Drowzee
- Hypno
- Krabby
- Kingler
- Voltorb
- Electrode
- Exeggcute
- Exeggutor
- Cubone
- Marowak
- Lickitung
- Koffing
- Weezing
- Rhyhorn
- Rhydon
- Tangela
- Kangaskhan
- Horsea
- Seadra
- Goldeen
- Seaking
- Staryu
- Starmie
- Tauros
- Ditto
- Porygon
Gen 2:
- Chikorita
- Bayleef
- Meganium
- Cyndaquil
- Quilava
- Typhlosion
- Totodile
- Croconaw
- Feraligatr
- Chinchou
- Lanturn
- Togepi
- Togetic
- Natu
- Xatu
- Bellossom
- Marill
- Azumarill
- Politoed
- Hoppip
- Skiploom
- Jumpluff
- Aipom
- Sunkern
- Sunflora
- Yanma
- Wooper
- Quagsire
- Murkrow
- Slowking
- Misdreavus
- Wobbuffet
- Girafarig
- Dunsparce
- Snubbull
- Granbull
- Quilfish
- Shuckle
- Heracross
- Sneasel
- Teddiursa
- Ursaring
- Swinub
- Piloswine
- Corsola
- Houndour
- Houndoom
- Kingdra
- Phanpy
- Donphan
- Porygon2
- Stantler
- Smeargle
Gen 3:
- Treecko
- Grovyle
- Sceptile
- Torchic
- Combusken
- Blaziken
- Mudkip
- Marshtomp
- Swampert
- Lotad
- Lombre
- Ludicolo
- Seedot
- Nuzleaf
- Shiftry
- Wingull
- Pelipper
- Shroomish
- Breloom
- Makuhita
- Hariyama
- Azurill
- Nosepass
- Skitty
- Delcatty
- Meditite
- Medicham
- Electrike
- Manectric
- Plusle
- Minun
- Volbeat
- Illumise
- Roselia
- Carvanha
- Sharpedo
- Numel
- Camerupt
- Torkoal
- Spinda
- Cacnea
- Cacturne
- Zangoose
- Seviper
- Lunatone
- Solrock
- Corphish
- Crawdaunt
- Baltoy
- Claydol
- Lileep
- Cradily
- Anorith
- Armaldo
- Shuppet
- Banette
- Duskull
- Dusclops
- Wynaut
- Snorunt
- Glalie
- Spheal
- Sealeo
- Walrein
- Clamperl
- Huntail
- Gorebyss
- Luvdisc
Gen 4:
- Turtwig
- Grotle
- Torterra
- Chimchar
- Monferno
- Infernape
- Piplup
- Prinplup
- Empoleon
- Budew
- Roserade
- Combee
- Vespiquen
- Buizel
- Floatzel
- Shellos (both West and East Coast forms)
- Gastrodon (both West and East Coast forms)
- Ambipom
- Buneary
- Lopunny
- Mismagius
- Honchkrow
- Glameow
- Purugly
- Stunky
- Skuntank
- Bronzor
- Bronzong
- Hippopotas
- Hippowdon
- Croagunk
- Toxicroak
- Finneon
- Lumineon
- Snover
- Abomasnow
- Weavile
- Magnezone
- Lickilicky
- Rhyperior
- Tangrowth
- Togekiss
- Yanmega
- Mamoswine
- Porygon-Z
- Probopass
- Dusknoir
- Froslass
Gen 5:
- Snivy
- Servine
- Serperior
- Tepig
- Pignite
- Emboar
- Oshawott
- Dewott
- Samurott
- Pansage
- Simisage
- Pansear
- Simisear
- Panpour
- Simipour
- Blitzle
- Zebstrika
- Roggenrola
- Boldore
- Gigalith
- Drilbur
- Excadrill
- Audino
- Tympole
- Palpitoad
- Seismitoad
- Darumaka
- Darmanitan
- Scraggy
- Scrafty
- Yamask
- Cofagrigus
- Trubbish
- Garbodor
- Minccino
- Cinccino
- Gothita
- Gothorita
- Gothitelle
- Solosis
- Duosion
- Reuniclus
- Ducklett
- Swanna
- Vanillite
- Vanillish
- Vanilluxe
- Deerling
- Sawsbuck
- Karrablast
- Escavalier
- Foongus
- Amoonguss
- Joltik
- Galvantula
- Ferroseed
- Ferrothorn
- Elgyem
- Beheeyem
- Cubchoo
- Beartic
- Shelmet
- Accelgor
- Mienfoo
- Mienshao
- Bouffalant
- Heatmor
- Durant
Gen 6:
- Chespin
- Quilladin
- Chesnaught
- Fennekin
- Braixen
- Delphox
- Froakie
- Frogadier
- Greninja
- Litleo
- Pyroar
- Flabébé
- Floette
- Florges
- Pancham
- Pangoro
- Espurr
- Meowstic
- Inkay
- Malamar
- Binacle
- Barbaracle
- Skrelp
- Clauncher
- Dragalge
- Clawitzer
- Helioptile
- Heliolisk
- Dedenne
- Klefki
- Bergmite
- Avalugg
Gen 7:
- Rowlet
- Dartrix
- Decidueye
- Litten
- Torracat
- Incineroar
- Popplio
- Brionne
- Primarina
- Crabrawler
- Crabominable
- Oricorio
- Mareanie
- Toxapex
- Dewpider
- Araquanid
- Fomantis
- Lurantis
- Morelull
- Shiinotic
- Salandit
- Salazzle
- Bounsweet
- Steenee
- Tsareena
- Comfey
- Oranguru
- Passimian
- Sandygast
- Palossand
- Togedemaru
- Bruxish
Gen 8:
- Grookey
- Thwackey
- Rillaboom
- Scorbunny
- Raboot
- Cinderace
- Sobble
- Drizzile
- Inteleon
- Wooloo
- Dubwool
- Perrserker
- Sirfetch’d
- Runerigus
Gen 9:
- Sprigatito
- Floragato
- Meowscarada
- Fuecoco
- Crocalor
- Skeledirge
- Quaxly
- Quaxwell
- Quaquaval
- Pawmi
- Pawmo
- Pawmot
- Smoliv
- Dolliv
- Arboliva
- Wiglett
- Wugtrio
- Varoom
- Revavroom
- Greavard
- Houndstone
- Cetoddle
- Cetitan
- Annihilape
- Clodsire
5km Buddy Distance Chart
Gen 1:
- Onix
- Hitmonlee
- Hitmonchan
- Chansey
- Mr. Mime
- Scyther
- Jynx
- Electabuzz
- Magmar
- Pinsir
- Lapras
- Eevee
- Vaporeon
- Jolteon
- Flareon
- Omanyte
- Omastar
- Kabuto
- Kabutops
- Aerodactyl
- Snorlax
- Dratini
- Dragonair
- Dragonite
Gen 2:
- Mareep
- Flaaffy
- Ampharos
- Sudowoodo
- Espeon
- Umbreon
- Unown
- Pineco
- Forretress
- Gligar
- Steelix
- Scizor
- Delibird
- Mantine
- Skarmory
- Tyrogue
- Hitmontop
- Smoochum
- Elekid
- Magby
- Miltank
- Blissey
- Larvitar
- Pupitar
- Tyranitar
Gen 3:
- Ralts
- Kirlia
- Gardevoir
- Slakoth
- Vigoroth
- Slaking
- Nincada
- Ninjask
- Shedinja
- Sableye
- Mawile
- Trapinch
- Vibrava
- Flygon
- Feebas
- Milotic
- Castform
- Kecleon
- Tropius
- Chimecho
- Absol
- Relicanth
- Bagon
- Shelgon
- Salamence
- Beldum
- Metang
- Metagross
Gen 4:
- Shinx
- Luxio
- Luxray
- Cranidos
- Rampardos
- Shieldon
- Bastiodon
- Pachirisu
- Drifloon
- Drifblim
- Chingling
- Bonsly
- Mime Jr.
- Happiny
- Chatot
- Spiritomb
- Gible
- Gabite
- Garchomp
- Munchlax
- Riolu
- Lucario
- Skorupi
- Drapion
- Carnivine
- Mantyke
- Electivire
- Magmortar
- Leafeon
- Glaceon
- Gliscor
- Gallade
- Rotom
Gen 5:
- Timburr
- Gurdurr
- Conkeldurr
- Throh
- Sawk
- Sandile
- Krokorok
- Krookodile
- Sigilyph
- Tirtouga
- Carracosta
- Archen
- Archeops
- Zorua
- Zoroark
- Alomomola
- Klink
- Klang
- Klinklang
- Litwick
- Lampent
- Chandelure
- Axew
- Fraxure
- Haxorus
- Cryogonal
- Stunfisk
- Druddigon
- Golett
- Golurk
- Pawniard
- Bisharp
- Rufflet
- Braviary
- Vullaby
- Mandibuzz
- Deino
- Zweilous
- Hydreigon
- Larvesta
- Volcarona
Gen 6:
- Furfrou
- Tyrunt
- Tyrantrum
- Amaura
- Aurorus
- Phantump
- Trevenant
- Pumpkaboo
- Gourgeist
- Noibat
- Noivern
Gen 7:
- Rockruff
- Lycanroc
- Turtonator
- Drampa
- Jangmo-o
- Hakamo-o
- Kommo-o
Gen 8:
- Mr. Rime
- Falinks
- Stonjourner
- Dreepy
- Drakloak
- Dragapult
- Wyrdeer
- Kleavor
Gen 9:
- Charcadet
- Armarouge
- Ceruledge
- Bombirdier
- Frigibax
- Arctibax
- Baxcalibur
- Gimmighoul
- Gholdengo
20km Buddy Distances Explained
All Legendary Pokémon and Ultra Beasts require you to walk 20km before they yield Candy. This includes Pokémon like Articuno, Moltres, and Zapdos from Gen 1, as well as Lugia and Ho-Oh from Gen 2, among others.
Due to the extensive distances required, it’s advisable to use Rare Candy to level up these creatures instead of relying solely on walking distances.
Other Things to Know About Pokémon Go’s Buddy System
- While most Pokémon follow you on the Trainer screen, walking 10km with Pikachu will allow it to sit on your shoulder, showcasing your close friendship. Similarly, Togepi will be held in your arms.
- Contrary to some beliefs, you do not earn XP for walking your Buddy Pokémon; you only receive Candy.
- There appears to be no daily limit on the amount of Candy you can earn through the Buddy system.
- Using a Pokémon Go Plus will contribute to the distance walked for your Buddy, similar to hatching Eggs.
- Pokémon assigned as your Buddy cannot be withdrawn from your inventory to defend a Gym, so consider using a lower tier of that Pokémon’s evolution chain.
- All creatures within the same evolution line require the same walking distance to earn Candy.
- Fainted Pokémon can still be used as your Buddy.
- Evolving your Pokémon resets the Candy counter, so plan your evolutions accordingly.
- Buddy distances also factor into the cost of unlocking a second move for your Pokémon, with longer distances leading to higher costs.
Related posts:
 Astro Bot, how to make a tough guy drop all his items to get the “Thug Thief” trophy
 Square Enix sales drop year-on-year, despite release of Final Fantasy 7 Rebirth
 Shiny Popplio, evolution chart, 100% perfect IV stats, and Primarina’s best moveset in Pokémon Go
 Shiny Ponyta, evolution chart, 100% perfect IV stats and Rapidash best moveset in Pokémon Go
 Shiny Tynamo, evolution chart, 100% perfect IV stats and Eelektross best moveset in Pokémon Go
 Shiny Cyndaquil, evolution chart, 100% perfect IV stats and Typhlosion best moveset in Pokémon Go
 Shiny Bounsweet, evolution chart, 100% perfect IV stats and Tsareena’s best moveset in Pokémon Go
 Shiny Bellsprout, evolution chart, 100% perfect IV stats, and Victrebel’s best moveset in Pokémon Go
 Shiny Litten, evolution chart, 100% perfect IV stats, and Incineroar’s best moveset in Pokémon Go
 Shiny Chansey, evolution chart, 100% perfect IV stats, and Blissey’s best moveset in Pokémon Go
 Pokémon Go Type chart, Type effectiveness and weakness explained
 Shiny Lechonk, evolution chart, 100% perfect IV stats and Oinkologne best moveset in Pokémon Go


Post Comment