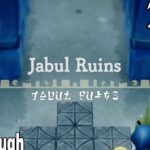
Jabul Ruins at 100% in The Legend of Zelda: Echoes of Wisdom

The Jabul Ruins, located within the Jabul Swamps, is one of the challenging dungeons in The Legend of Zelda: Echoes of Wisdom. This guide will help you navigate the dungeon and complete it 100%, ensuring that you uncover all secrets and treasures along the way.
How to Complete the Jabul Ruins
As you start your adventure in the ruins, you will find yourself in a corridor where the ground suddenly gives way, dropping you into a flooded cavern. Use your binding ability to move the large rock blocking your path. After clearing the way, descend further until you encounter a massive fish that creates a tornado behind you. Don’t worry; you won’t face this boss just yet.
Once you regain control, swim to the right while dodging enemies and obstacles to avoid the swirling tornado. At the end of the passage, climb the ladder and enter a room filled with foes, which will lead you back to the base floor where you’ll find a teleport pillar and a door to continue your journey.
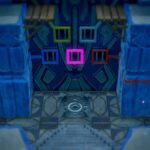
This door opens into a large area we’ll refer to as the central vestibule, which features a mural and five colored squares. Here, you’ll find a purple button on the floor. Press it to activate a water source that will aid your progress through the dungeon.
From the vestibule, you can take the stairs to your left or right. Start by heading right. In this 2D cave, cross over the first body of water, then jump across two wooden planks to reach a chest containing the dungeon map.
Next, dive into the water filled with fish bombs and swim down to the right to find a staircase leading to a room with barred walls. Be cautious of the three dangerous sharks swimming around. Use the aquatic monster replicas to defeat them, then check the northern barred wall for a wooden crate that you can move with binding.
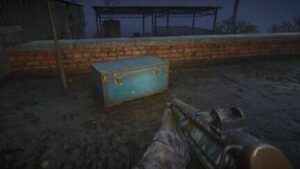
Climb up into the opening that leads to a chest containing 50 rupees. From there, jump onto the wooden platform to the right and cross two ropes above the water to reach another staircase leading to a closed room filled with crab enemies. Eliminate them to proceed through the next door into a room with a red button that will allow you to raise the water level in the central vestibule.
After activating this button, return to the vestibule and descend the stairs on the left side. Here, you’ll enter a dark 2D cave. Swim left while dodging various monsters, and if you become disoriented, consult your map for the exit. Before leaving, make sure to collect the chest in this area containing 100 rupees.
Upon exiting, you’ll find yourself in a room with a closed door. Dive into the water and use your binding ability to retrieve a braziers from the water. Use a flaming Zol replica to ignite the three unlit braziers, thus unlocking the door.
On the other side, you’ll find a room with a blue button to raise the water level even higher in the vestibule. Return to the central vestibule and jump into the large water jet to ascend to the upper floor. First, take the stairs to the right, leading to another 2D cave.
In this cave, remove a heavy rock with binding that sits on a wooden plank so you can dive below and discover a chest containing a golden egg. Then, repeat the process with another heavy rock above the second wooden plank. Dive down again and move another rock atop another plank, then swim right to pull the plank away and break a cracked block with a fish bomb to access the chest containing the big key for the dungeon.
After securing the big key, go back to the last plank you moved, swim right, and ascend past some electrified jellyfish and wooden boxes. Before breaking the boxes with a fish bomb, ensure you eliminate the jellyfish and break additional boxes above to create an oxygen pocket.
Exiting this cave, you’ll enter a room filled with enemies. Defeat them to clear the path to the green button room. First, take out the Deku slugs, then create a replica of a heavy rock to press the button.
Next, return to the upper floor of the central vestibule and go through the left door. In this room with a water current, stand on the wooden planks and cling to the left one to jump down to solid ground just in time to avoid falling into the abyss. Then, swim upstream, jumping between the planks until you reach another door.
Inside, there will be a water room with five eye mechanisms that need activating. Start by creating stairs to the right of the first mechanism, allowing you to reach it easily. Next, jump into the water and activate the mechanism at the back, surrounded by sea urchins. After that, climb onto one of the floating boxes and jump to the central mechanism to activate it.
Head to the closed door and build a staircase with boxes to reach another mechanism blocked by wooden boxes. Burn these boxes using a flaming Zol replica. Finally, go to the lower left corner of the room, create more staircase boxes from the ground, and climb to a rocky pillar.
From the top of this pillar, activate the sword technique to shoot an arrow in the air to hit the last mechanism. After opening the door, defeat the enemies in the next room to access the yellow button room. Pressing this button will enable the water jet in the central vestibule to become strong enough for you to reach the boss door.
Battle Against the Boss Vóctex
The weak point of this boss is the blue sprouts on its back. To damage them, you’ll need to dodge the wind tornadoes it unleashes. After launching several tornadoes, it will tire and become still.
Take this opportunity to approach and activate sword technique to easily damage its two sprouts. Destroying the sprouts temporarily exposes its back, allowing you to inflict significant damage.
After enough damage, the boss will enter its second phase, where two portions of water will disappear, complicating your movements. It’s advisable to stay in the water to continue avoiding the tornadoes.
Maintain the same strategy as before, but be aware that the boss will create larger tornadoes that are slower and easier to evade. Wait for the tornadoes to finish, then strike its back when possible. Eventually, you will deal enough damage to defeat it.
Upon victory, your character will level up, making certain replicas cost fewer power points. Don’t forget to collect the new heart container before leaving the dungeon.
Related posts:
 Zelda Echoes of Wisdom Jabul Ruins Dungeon walkthrough
 Sudelia Ruins at 100% in The Legend of Zelda: Echoes of Wisdom
 The Ruins Breach in The Legend of Zelda: Echoes of Wisdom
 Zelda Echoes of Wisdom Suthorn Ruins Dungeon walkthrough
 Gerudo Crypt at 100% in The Legend of Zelda: Echoes of Wisdom
 Frequently Asked Questions in The Legend of Zelda: Echoes of Wisdom
 The mystery of the breaches in The Legend of Zelda: Echoes of Wisdom
 Escape from Hyrule Castle in The Legend of Zelda: Echoes of Wisdom
 The cave gap in The Legend of Zelda: Echoes of Wisdom
 After the fade-outs in The Legend of Zelda: Echoes of Wisdom
 Chaos in Zora Bay in The Legend of Zelda: Echoes of Wisdom
 The River Zora Region in The Legend of Zelda: Echoes of Wisdom


Post Comment