The Swamp Gap in The Legend of Zelda: Echoes of Wisdom

The Swamp Gap is one of the main quests in The Legend of Zelda: Echoes of Wisdom, directly tied to the Goddess Gaps mission. This quest will activate in your journal once you reach the Faron Swamp, located southeast of Hyrule Castle, after completing the dungeon at the castle. In this guide, we will walk you through the objectives and steps to complete this mission without getting stuck.
How to Complete the Swamp Gap Mission
To begin this mission, you first need to find a way to reach the Faron Swamp region.
How to Get to the Faron Swamp?
There is a viable path to the Faron Swamp, and it is very close to Lake Hylia. Head to this lake, located southeast of Hyrule Castle, and when you arrive, jump into the water and swim towards the bottom right corner, where you’ll find a large waterfall. Using replicas of objects, you can climb to the top of the waterfall (for example, by stacking beds or, more conveniently, using a platform if you have it memorized in your encyclopedia).
Once at the top of the waterfall, it will be easy to head to the right and descend along a rocky wall leading to the path that opens up to the Faron Swamp, where you will encounter a guard from the citadel.
Who Has a Customer Card?
Upon entering the swamp, the mission will officially begin. Follow the only possible path until you meet two small Dekus. Continue right and up to find the location of the large gap in the region, which has formed inside the building called Sweet Nook.
This building is a sort of temple that you can only enter after obtaining the customer card, as explained by some Dekus. So, how can you get this card? Let’s find out…
If you head directly down from the entrance of Sweet Nook, you will arrive at Deku City, where you can ask the residents if they know anything about the card. Through inquiries, you will learn that a character named Fronde possesses one of these cards and is located near the gap southeast of the city.
Leave the city via the right path and descend a slope filled with weeds and two Deku Babas, then continue down to a path that leads to the southeast corner of the region. You will reach a pond with a stone statue shaped like a Deku (this will confirm you are on the right track). Keep going down and pass a position where an electric summoner is located to arrive at a teleport pillar and find Fronde.
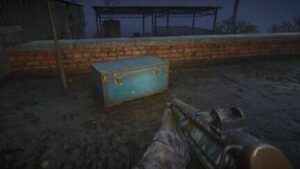
This Deku character is right in front of the gap that has swallowed his house. Enter the gap using the Tri portal to descend into the void zone of Fronde’s house.
Void Zone of Fronde’s House
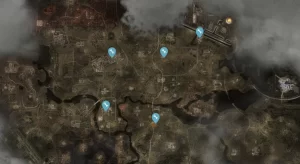
In this void area, you will need to find 5 Tri companions. Their locations are as follows:
- Companion 1: From the start, walk straight ahead, and you will see this group behind a web that you can burn with a brazier.
- Companion 2: Climb the rocky wall to the left of the previous group and you will find a giant dark Goponga flower that you must defeat to rescue this group.
- Companion 3: Head left from the previous group to rescue this one, which is located among three Deku Baba enemies.
- Companion 4: Climb the rocky walls to the top and enter a cave. Go down until you reach a hanging spider, defeat it, and create a web in the last gap on the left. Climb the thread and break the cracked blocks above to rescue this group.
- Companion 5: Exit the cave and go right where there are some lit torches. Put them out with an air cannon and cross to burn a web to rescue this last group.
How to Escape the Deku Prison?
Unfortunately, after closing the gap, you will find yourself trapped in the Deku prison without your belongings. Fortunately, retrieving them will not be too complicated, although escaping the prison requires some strategy.
Start by launching a link toward the key of the cell on the other side of the door. Use it to get out. Now, do not head out the main door of the prison; otherwise, you will be re-captured. Instead, go down the left staircase. You will enter a room with Dekus on guard.
The first Deku can be avoided by pushing the box on the right when the Deku is on the left side. Next, lift the box next to the two pots and break it along with the adjacent pot. Finally, push the last box to the left as shown in our previous image.
The next Deku is easy to avoid; simply wait for it to turn its back before moving. Eventually, you will encounter a pair of Dekus. Move the boxes as shown in the following image, and you will be able to pass without being seen when both are facing away from your position.
Once in the lower floor of the prison, open the cell door on the right and go down the dirt slope to retrieve the stone bed using the link. Go back up with it and pass through the door to the hallway (jumping to let the bed clear the door). Then place it next to the extinguished brazier on the right to ascend to the ledge.
As you pass through the door, you will find the Deku that took the scepter. You will finally recover it along with all your belongings. Before heading back up, you can return to the previous hallway and move the bush located between two others to find a hidden door. This leads to a small room with a heart piece on top of some totem-like statues that you can easily collect with your replicas.
Now, return to the upper floor of the prison and go through the right door, which leads to another room with more Dekus guarding. To avoid the two in the hallway, create replicas of objects to climb on top of the stone blocks. From here, cross to the right without touching the ground and distract the last Deku by throwing an object and run toward the door leading to a well.
Jump into the well to enter a cave. Progress forward, place the heavy stone on top of the wooden boxes, jump into the water, and create a bomb fish to break the next two boxes. Walk to the right, and upon reaching the large water jet, you can avoid it by stacking several beds from the wooden box floating on the surface (or using water blocks, as we did).
In the next water section, you will see stairs leading to the outside near another double air jet. Initially, you might think there is no way to reach them. The way to achieve this is quite curious. You will need to link to one of the wooden boxes in the adjacent gap, let the box descend to the bottom of the water, and then mimic its movements while holding the R button.
By imitating the box’s movements, you will slowly ascend to the surface without being pushed down by the air jet. You can apply this same method at the right end of the cave if you want to collect the power piece located there before exiting.
Finally, after successfully escaping the prison, you will obtain the customer card from Fronde. You can now return to the entrance of Sweet Nook. Enter and defeat the dark enemies that appear to gain access through a portal to the void zone of the Faron Swamp.
Void Zone of Faron Swamp
The path through this void zone is very linear. Simply progress forward while avoiding or defeating enemies and head toward the upper right corner of the map of this area to reach the entrance of a cave that is blocked by flames and six lit braziers.
You will need to extinguish all the braziers simultaneously, which can be achieved by placing a couple of replicas of expelling orbs on each side. This way, the flames will go out, and you can enter the cave.
Inside the cave, simply climb upwards along the rocky walls until you reach a room with three green pillars. Here, you need to use a replica of an electric keese to quickly ignite all three pillars.
Once you succeed, you will be able to ascend through a door that opens to another void area, which will actually be the first section of the Temple of Faron, the dungeon for this region. We will cover how to conquer it in its own section. After completing it, this mission will come to an end.
Related posts:
 The cave gap in The Legend of Zelda: Echoes of Wisdom
 The Southern Gap in The Legend of Zelda: Echoes of Wisdom
 The Marsh Gap in The Legend of Zelda: Echoes of Wisdom
 The Lanayru Gap in The Legend of Zelda: Echoes of Wisdom
 How many hours is The Legend of Zelda Echoes of Wisdom?
 Frequently Asked Questions in The Legend of Zelda: Echoes of Wisdom
 The desert breach in The Legend of Zelda: Echoes of Wisdom
 After the fade-outs in The Legend of Zelda: Echoes of Wisdom
 Temple of Eldin at 100% in The Legend of Zelda: Echoes of Wisdom
 The Lizalfos Burrow in The Legend of Zelda: Echoes of Wisdom
 Hyrule Castle at 100% in The Legend of Zelda: Echoes of Wisdom
 Temple of Lanayru at 100% in The Legend of Zelda: Echoes of Wisdom


Post Comment