Nihil and the ultimate power in The Legend of Zelda: Echoes of Wisdom
Nihil and the Ultimate Power is an essential quest in The Legend of Zelda: Echoes of Wisdom. This chapter becomes accessible after finishing the previous quest, Las brechas de las Diosas, which involves exploring the dungeons of the Temple of Eldin, Temple of Lanayru, and Temple of Farone. In this guide, we’ll outline what you need to do to successfully complete this mission and provide useful tips to help you along the way.
Completing the Mission: Nihil and the Ultimate Power
After regaining control of Zelda in her castle chambers, your primary goal is to make your way to the primordial forest, where the sacred tree stands. Specifically, you should head to the Arcane Forest, located in the northwest region of Hyrule Citadel.
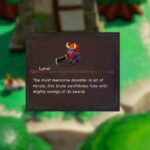
As you travel, consider this suggestion: while not absolutely necessary, it might be beneficial to look for the centaleón in the area to add its replica to your encyclopedia. This creature is among the strongest monsters in the game and can prove invaluable in upcoming battles.
Exploring the Arcane Forest
Upon entering the forest, make sure to activate the teleportation pillar if you haven’t done so. Whether you’ve been here before or are visiting for the first time, keep in mind that your map will be ineffective due to the thick fog that obscures your surroundings.
However, navigating this forest won’t feel like an aimless maze. The paths are distinct and do not loop back on themselves, allowing you to traverse the area with some spatial awareness.
Start by following the path that leads north from the entrance. Continue until you reach a fork in the road. Choose the left path and then head upward to find a teleportation pillar near some citadel soldiers.
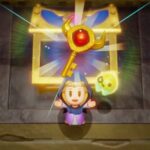
After talking to them, interact with the gravestone adorned with the Triforce symbol. Doing so will allow you to memorize the arcane orb.
- Your next objective is to place an arcane orb on each of the six pedestals scattered throughout the forest.
- Start with the pedestal located near the soldiers.
- There is no specific sequence for placing the orbs on the pedestals.
- Be sure to keep enough Tri power points to create six replicas of these orbs (each costs 1 power point).
- Manage your replicas wisely; otherwise, you may need to revisit earlier pedestals.
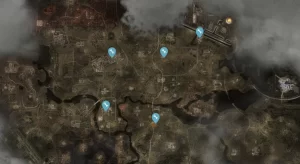
Instead of detailing the route to each pedestal, we find it more effective to illustrate their locations on a map highlighted with red circles.
Although the fog can complicate navigation using your map, you can still orient yourself by using the gravestone or the forest entrance as a reference. The pedestals form the shape of the Triforce throughout the area.
Once you’ve successfully placed all the orbs, return to the mural at the grave and examine it to uncover a hidden path. Additionally, the fog will dissipate on your map. Follow this new path to encounter the Great Deku Tree and descend into the Arcane Ruins.
Entering the Void of the Arcane Ruins
After the cutscene within the ruins, cross the mural to access the expansive void area of the Arcane Ruins.
Though this space is large, your goal remains clear: traverse all platforms toward the north. At this stage, it shouldn’t prove too challenging. There are multiple routes available, especially since you can use the cloud replica to navigate the area quickly.
Upon reaching the other side, you will encounter the false Zelda. This fight is relatively straightforward, as Zelda will primarily fly and summon replicas of dark monsters to confront you, posing little threat.
While she is in the air, it’s advisable to utilize replicas of your monsters to defeat the dark creatures and gather energium. Once you’ve collected enough energy, activate swordmaster mode and launch bombs or fire arrows at Zelda to bring her down.
When she is grounded, attack her with bombs or melee strikes. After landing several hits, she will take flight again, and the cycle will continue.
After defeating her, use any replica to hit the purple crystal that has trapped Link. This will finally free him, completing the mission Al rescate de Link, el héroe, which has been a long-standing objective in the story.
Now, all that’s left is to enter the final dungeon of the game, the Interior of Nihil. When you’re ready, return Link’s weapons to him. As Tri will inform you, this signifies a point of no return. Make sure you are fully prepared before moving forward. After completing the dungeon, the game will conclude, but you will have the option to continue from a saved checkpoint at this stage.
Related posts:
 Nihil interior at 100% in The Legend of Zelda: Echoes of Wisdom
 ALL the Power Pieces in Zelda: Echoes of Wisdom and how to get them
 Escape from Hyrule Castle in The Legend of Zelda: Echoes of Wisdom
 The cave gap in The Legend of Zelda: Echoes of Wisdom
 The Ruins Breach in The Legend of Zelda: Echoes of Wisdom
 Chaos in Zora Bay in The Legend of Zelda: Echoes of Wisdom
 The River Zora Region in The Legend of Zelda: Echoes of Wisdom
 The Marsh Gap in The Legend of Zelda: Echoes of Wisdom
 The volcano breach in The Legend of Zelda: Echoes of Wisdom
 The Goddess Gaps in The Legend of Zelda: Echoes of Wisdom
 The Lanayru Gap in The Legend of Zelda: Echoes of Wisdom
 To the rescue of Link, the hero in The Legend of Zelda: Echoes of Wisdom


Post Comment