100% Terminus easter egg guide in CoD Black Ops 6 Zombies: All steps
Terminus is an exciting map featured in the Zombies mode of Call of Duty: Black Ops 6. Like other maps in the series, it includes a main easter egg that players can uncover by completing a series of specific tasks while fending off waves of zombies.
Completing this easter egg can be quite challenging without help, as many objectives might be hidden or unclear. This guide will provide a step-by-step walkthrough to help you finish the easter egg smoothly. You can attempt it solo or in a group, but the latter is recommended for better chances of success.
Step 1: Restore the Energy
Your first objective is to follow the in-game instructions to restore energy to the facilities by activating three CME generators (ether maturation capsules costing 500 essence), which will unlock the Pack-a-Punch machine.
- The first generator: Located in the starting area at the prison guard post.
- The second generator: Found inside the residential building.
- The third generator: Situated in the biological laboratory.
After activating these generators, zombies will spawn and attempt to destroy them. Eliminate the zombies until the activation is complete; it’s fairly straightforward.
Step 2: Craft the Sonic Collider DRI-11 Weapon
Once the energy is restored, you can craft the Sonic Collider DRI-11, essential for completing the easter egg. While it can be found in mystery boxes, creating it directly is advisable. You will need the following materials:
Obtain the Electromagnetic Key
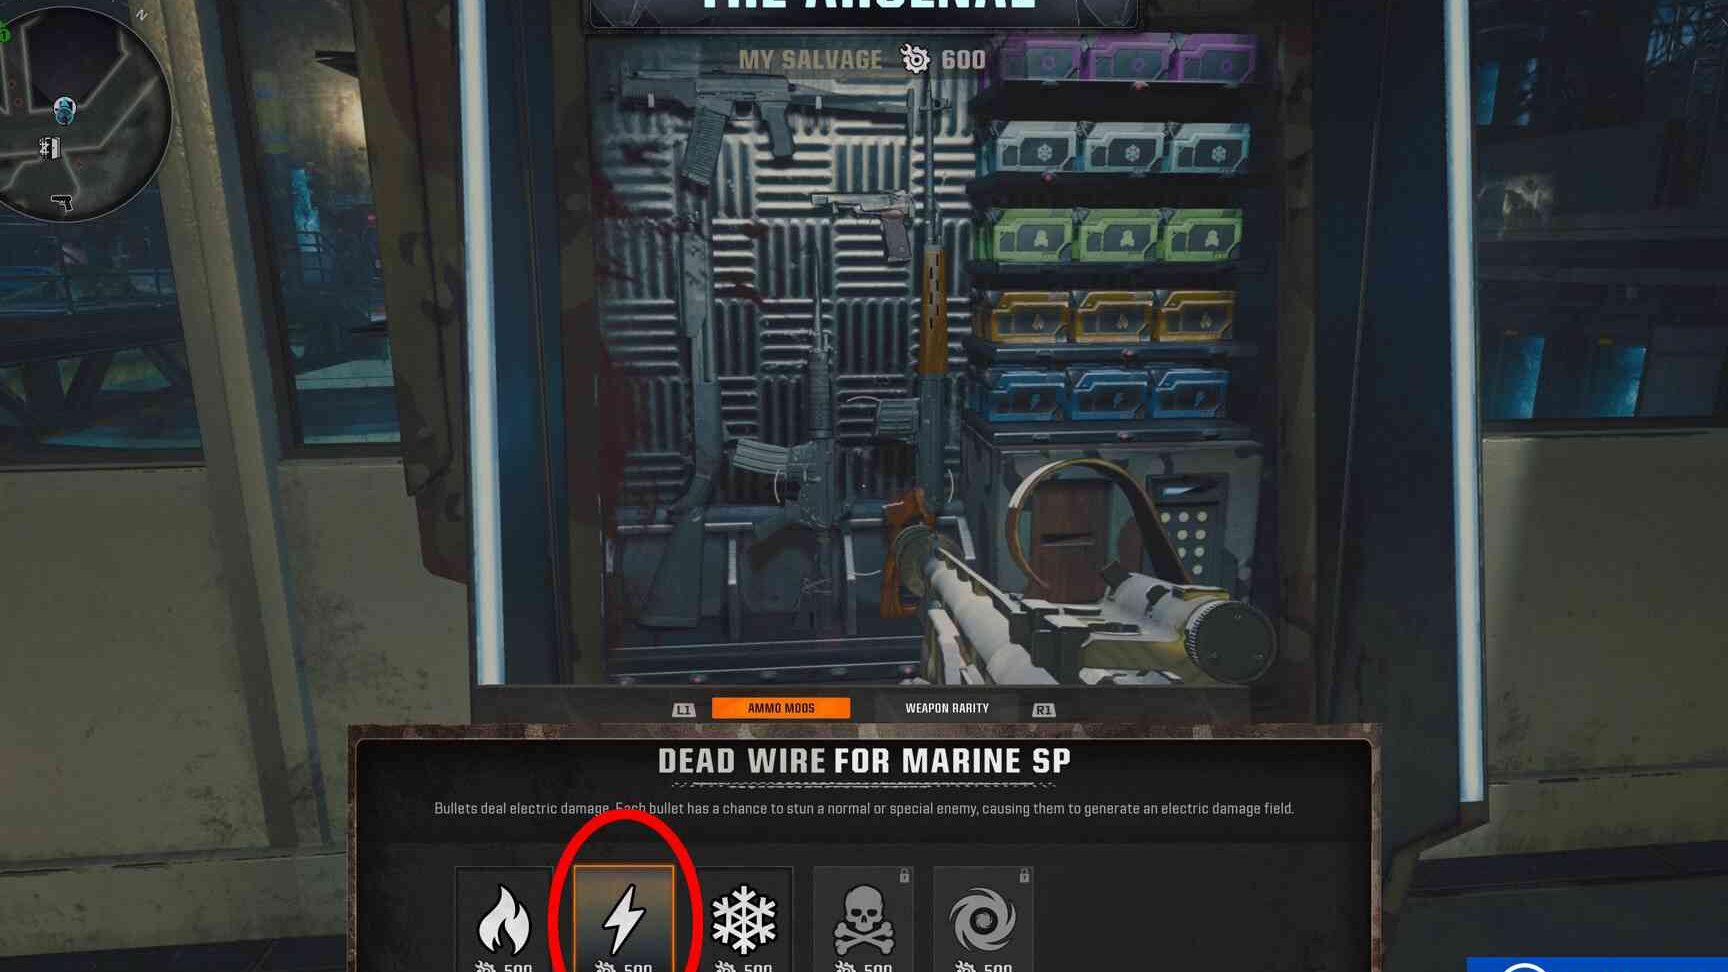
First, visit an arsenal machine and acquire the “Dead Cable” mod for your ammunition to deal electrical damage. This mod is necessary to shoot specific panels and “transport” energy to a door.
- Go to the biological laboratory and activate the elevator where the Pack-a-Punch machine is.
- As the elevator rises, aim at an open window inside the laboratory and quickly shoot the panel visible there.
- While the elevator ascends, shoot another panel on a wall halfway up, and finally, shoot a panel at the top of the building wall.
- Next, enter the residential building, where you will find another panel next to the CME generator.
- Exit through the door next to the generator into the playground area, where you will see another panel on the outside wall of the residence.
Successfully electrocuting these five panels will unlock the doors to the research office. Inside, defeat the zombie named Anya Tonovsky and collect the electromagnetic key she drops.
Obtain the Multifunction Resonator
- With the electromagnetic key, head to the main room of the marine tower (where there’s a loud machine).
- Look for a briefcase on a table with a severed hand.
- Use the key to open the briefcase and collect the multifunction resonator.
Obtain the Portable Symbols
After securing the multifunction resonator, return to the research office and interact with the oscillation calibrator, resembling an old computer with a screen. To activate it, you need to acquire up to three codes (X, Y, Z) with associated symbols.
These symbols can be found on laptops scattered around the island:
- Portable #1: Located outside the interrogation rooms, next to the stairs leading down to the storage area.
- Portable #2: Found outside the control center, near the stairs leading down to communications.
- Portable #3: Situated in the dock area under the marine tower, beside the stairs leading down to the dock where you can find a boat.
Decipher the Mathematical Riddle of the Oscillation Calibrator
After interacting with the laptops, return to the oscillation calibrator machine. You will see the three codes (X, Y, Z) and their associated symbols (which vary in each game). You need to input a numeric password combination. By examining the formulas on the whiteboards in the office, you can solve the mathematical riddle.
Each letter and symbol corresponds to a different number (these numbers are fixed and do not change):
- The first equation requires: 2X + 11; multiply “X” by 2 and add 11 to get code 1.
- The second equation requires: (2Z + Y) – 5; multiply “Z” by 2, add “Y,” and subtract 5 to get code 2.
- The third equation requires: (Y + Z) – X; sum “Y” and “Z,” then subtract “X” to get code 3.
Keep in mind that the only thing that changes in each game is the symbol corresponding to each letter (X, Y, Z). Once you identify these symbols, solving the puzzle becomes straightforward by performing the mathematical operations as described to find the resulting digits for the code.
If the calculations feel overwhelming or confusing, you can always visit the guard post in the prison and pay 5,000 essence to Peck to have him display the correct combination on a computer screen.
Charge the Resonator with Energy
After entering the correct code in the calibrator, progress to the next round, and a map of Terminus will appear on the machine’s screen, indicating one of the islands surrounding the prison.
Retrieve the resonator from your inventory and head to the docks beneath the marine tower to board a boat and travel to the designated island.
- On the island, you will discover an energy orb where you need to place the resonator.
- Once you do this, more zombies will spawn; defeat them and watch for any that drop energy on the ground.
- Collect the energy and return it to the orb.
- You will need to repeat this process multiple times to fully charge the orb.
After completing this, the orb will change location and color, moving to another island in Terminus. Retrieve the resonator again, board the boat, and travel to the next island to repeat the process once more. You will have to do this one final time to fully charge the resonator.
Once this is done, return to the research office and assemble the Sonic Collider DRI-11 at the workbench.
Step 3: Obtain the Hard Drive
With the Sonic Collider DRI-11 ready, your next task is to find a hard drive. This item can be acquired by shooting a tentacle trap located above certain doors on the map.
There are four traps situated in the following locations:
- On a door in the containment cell area.
- On a door of the residential building.
- On a door of the biological laboratory leading to the mining tunnels.
- On a door of the biological laboratory connecting to the marine caves.
To obtain the hard drive, you must activate the trap with 750 essence and then shoot the tentacles with the Sonic Collider for several seconds. If you target the correct trap, the hard drive will drop to the ground. The item randomly appears in one of the traps during each game, but you can identify it beforehand by checking for an identification card lying beneath the trap.
After acquiring the hard drive, return to Peck and Strauss at the guard post in the containment cells and insert it into a slot next to the glass.
Step 4: Discover the Code to Free Nathan
Once Peck and Strauss analyze the hard drive, head to the biological laboratory and locate the machine in the center where the character Nathan is imprisoned. To free Nathan, you need to determine the 3-digit code to enter on the numeric panel.
This code changes with each game, but fortunately, the objects indicating the digits are always the same, in this order:
- Clock in the interrogation room: On the other side of a gate in this room, there’s a wall clock displaying a time (the hour indicated by the shorter hand is the first digit of the code).
- Playing card in the canteen: On a cork board in this building, there’s a playing card with a number (this will be the second digit of the code).
- Poster in engineering: Inside this building, a yellow poster states the number of days without accidents (this is the third digit of the code).
After obtaining the code, return to the capsule containing Nathan and enter it on the numeric panel. Then, turn the valves around the capsule (if you’re in a group, ensure everyone turns them simultaneously).
After opening the capsule, prepare to fight a large horde of zombies, including a mini-boss. Following the battle (and a cutscene), dive into the water in the laboratory to search for a golden card.
Step 5: Repair the Communication Network
Next, go to the communication room on the island and interact with a computer to discover an error in the communication network that needs fixing.
Then, return to the docks and take a boat to the large shipwreck in the water. Navigate around the side of the ship to find an opening in its hull. Enter and you will see a ladder.
Climb the ladder, and using the card you found earlier, a hatch will open into a room. Once inside, collect a node connector device from a table, but prepare to fend off a wave of zombies to escape the room.
After clearing the area, take the node connector to three different locations where there are tubes that need repair. These locations are:
- On the island directly across from the wrecked ship, near the shore.
- In the dock area, right beneath the marine tower on the rocks.
- In one of the tunnels of the marine caves.
Note that one of the three locations will always be fixed by default, while two others will be randomly broken, so you will need to check them to determine which ones require repairs.
Step 6: Hack the Buoys with Beacons and Stop the Bombs
After repairing the network with the node connectors, return to the guard post to receive further instructions from Peck. After your discussion, you’ll be able to collect the hacking device.
Using this device, you need to travel by boat to some buoys in the sea to hack them.
- There are 3 buoys in total, each equipped with a beacon and a flashing light (they are always found floating between the islands in the same locations).
- While hacking them, be cautious of zombies and especially the tentacle arm that may rise from the water to infect you.
- After hacking the first buoy, a 2-minute time limit will begin to hack the next two.
- If you fail to hack all three buoys in time, you can try again in the next round.
After successfully hacking the buoys, you will receive a new message, and a countdown of 5 minutes will begin for a thermonuclear detonation. To survive, you must enter the biological laboratory and deactivate three bombs before time runs out.
Two bombs are located on the lower floor of the laboratory in different spots along the walkway, while the third is on the middle floor, just below the project room. Expect a large number of zombies and elite enemies during this step, making it critical to act quickly and find a way to disable them (utilize distraction items if you have them).
Step 7: Defeat the Boss Patient 13
If you manage to deactivate the bombs in time, your final challenge will be to battle the special final boss of this easter egg: Patient 13. To access this encounter, interact with a white door on the ground floor of the laboratory.
Ensure you prepare thoroughly before facing Patient 13, as this fight is extremely difficult, and numerous zombies will complicate matters.
- The key to defeating him is to target his weak points whenever possible (these are quite obvious; look for the reddish bulbs on his tentacle arms or shoulders, his large mouth, or his head).
- You can also shoot at the arms that shoot acid from a distance when their bulbs light up; this will also damage the boss.
- Be particularly careful not to stand in front of him when he raises his tentacles, as this attack can knock you down instantly if you’re low on health or armor.
- The fight comprises three phases (each representing one-third of the boss’s health).
During the final phase, be alert as Patient 13 may charge a massive orb of electrified energy and unleash it onto the stage, which can kill you instantly. To avoid this attack, dive into the water or hide behind the containers at the dock.
Additionally, stay clear of his tentacle tongue when he extends it toward the dock. If he grabs you with it, you will also die unless you deal significant damage to him quickly. Once you successfully lower his health, you will witness the final cutscene, completing this easter egg.















Post Comment