Gerudo Crypt at 100% in The Legend of Zelda: Echoes of Wisdom
The Gerudo Crypt, located in the Gerudo Desert, is one of the dungeons in The Legend of Zelda: Echoes of Wisdom. It serves as the second dungeon you will encounter during the quest Desert Gap. This guide will help you explore the crypt, solve its puzzles, defeat its bosses, and find all the secrets and treasures hidden within its walls.
How to Complete the Gerudo Crypt
Your adventure begins in the first room, where your first task is to create a heavy rock on the right side to block the first air cannon in this area. This will allow you to climb the wall with handholds and push another heavy rock to seal the air current on this side. Afterward, head up the stairs.
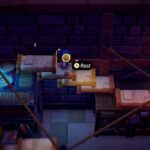
In the next room, you will find a locked door that requires a key and two open doors on either side. If you choose the left door, you’ll enter a room with flying tiles. Once you destroy them all, a chest containing 20 rupees will appear.
Now, proceed to the right room. Here, you will need to pull a mechanism that gradually retracts into the wall. Quickly, hop onto the conveyor belts and create a trampoline to reach the door before it closes. Once through, use your binding ability on a wall with two grips to pull it back and access a hidden chamber that holds a small key.
With the key in hand, you can unlock the previously sealed door. Pass through the room filled with snake statues and enter another chamber where you will find the boss door half-buried in the sand. Beware of two moth-like enemies that will attack you here.
Defeat the enemies to unlock a left door. As you explore, keep an eye out for a nearby room with a chest that you cannot yet access. Continue downwards, crossing the conveyor belt room to reach a ladder on the other side. Climbing down, you will enter a 2D room with level 2 bouncy tiles. Before progressing, remember that in the right sand pit, you can use a mole to dig up a chest containing a golden egg.
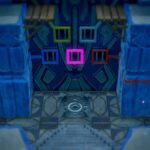
Next, you will find yourself in a room with a teleportation pillar and a plaque that indicates you must find two offerings on this floor to open the golden door ahead.
Let’s start by heading to the room on your right. To enter, launch a binding to the wall and pull it back. Move to the adjacent room, pull a buried chest from the ground to obtain 10 halite stones, and clear the sandy mound on the upper right with an air cannon to find a clue.
Return to the previous room and take the left door, leading you into a space where you must battle a poe, a ghost that leaves fire hazards in its wake and constantly retreats. You can easily defeat it using replica bouncers. Once defeated, it will drop a treasure chest containing the dungeon map. Exit through the newly opened lower door.
This door leads to a void area in the Gerudo Crypt. Before proceeding, you should notice a high window on the right through which you can squeeze for some rupees. Move forward along the only path available at the bottom.
Upon reaching the area with fish-like enemies, don’t forget to open the chest containing 20 rupees before making your way to what appears to be a tower. Here, you must use your binding ability to rotate the base and ascend the stairs. At the top, there’s a chest containing 50 rupees. Navigate around the platforms from left to right to reach the roof of the crypt building.
Once on the roof, defeat the enemies and use an air cannon to clear the sandy pile to the south, revealing a chest with a monster stone inside. To the left of the teleportation pillar, you can use a replica mole on a sand square to drop down into the floor 1 room of the dungeon, where another chest containing 50 rupees awaits.
Fast travel back to the teleportation pillar on the crypt’s roof and head to the right, descending the two climbable panels to the lower ground, where you’ll find a door leading back inside. Do not go through this door just yet. Instead, proceed to the floating platform on the right and use your object replicas to ascend this side of the area, where you’ll encounter a group of three gibdos.
Eliminate them to find another tower that you can rotate with the binding to ascend the stairs and memorize the replica of the hawk statue. Now, return to the lower ground and enter the door you previously passed by.
Inside this room, pull the mechanism as far back as you can, then quickly jump into the quicksand area and place a trampoline to bounce towards the closing door (there’s also another locked door nearby that we’ll return to later).
Upon entering this next room, you will face two gibdos and a redead, alongside three cat statues. Clear the enemies and then jump behind the statue blocking the door using a trampoline. Proceed through the corridor filled with pots to enter the mini-boss room.
This time, the mini-boss is another version of Dark Link, equipped with a bow. You can defeat him easily by creating monster replicas and attacking in sword mode. You can regain energy during the fight, so keep that in mind.
After inflicting some damage, up to three copies of Dark Link will appear, but the strategy remains the same. Once you defeat him, you will collect the Power Bow, which you can now use in sword mode.
Climb up the newly opened stairs. As you enter this 2D room, activate sword mode and shoot your arrows at the zoro zoro nest to eliminate it and prevent these creatures from bothering you. Next, head down to the right edge and fire arrows from your bow to remove the blockade on the other side. Jump across on a flying tile and ascend the stairs.
In this new room, you must cross rows of conveyor belts without getting burned by creating heavy rocks to shield yourself from the fire. This will lead you to a chest containing a small key, located next to some elephant statues.
Make sure to memorize one of these statues with your scepter, collect the key, and return to the area where the locked door was to use it (you can fast travel back to the teleportation pillar from the roof in the void area).
Open the locked door and inside, throw the binding against the wall to push it and discover a secret access. This leads to a room with three unlit torches that you need to ignite.
First, activate sword mode and shoot an arrow at the wooden box that sits below the air cannon in the corner. Then, ascend the stairs to the right, throw binding at the fire mechanism, and walk downstairs to rotate it rightward so it ignites the left torch. You can ignite the other two torches by launching a replica of a flaming zol at them.
With all three torches lit, a plaque with the last clue will appear. Now, return to the teleportation pillar in the room with the golden door where you need to offer the offerings. You should know what to do next, right?
On one plaque, create a replica of the elephant statue, and on the other plaque, create a replica of the hawk statue. Upon doing this, the golden door will open. Step through and pull the plug to lower the sand in the part of the crypt that has the boss door.
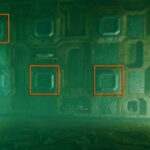
Next, head to the room on the right to find the boss key chest, which is surrounded by barriers. To access it, follow these steps:
- Grab the rotating mechanism and turn it three times to the right to lower the first blue barrier.
- Then, grab the green barrier with binding and pull it back once to shift its position.
- Finally, grab the rotating mechanism again and turn it two times to the left.
After completing these actions, you will be able to retrieve the great key of the dungeon. Ascend the right stairs and open the door leading to the boss when you are prepared.
Combat Against the Boss Togryf
During the first phase of the battle with the boss Togryf, hit him with your sword and use monster replicas in close combat to inflict damage. His movements are easy to dodge, and he will only attack by lunging from the sand or sending sand blasts with his hands.
After dealing enough damage, the second phase begins, where Togryf takes flight and quicksand appears on the battlefield. Here, it is advisable to use flying monster replicas (like the Guay or Negri) to deal extra damage. The key is to collect energy from the sand mounds that the boss leaves behind while attacking to charge your sword mode.
You need to charge the sword to activate it, then aim at the boss with ZL and shoot him with arrows when he is in sight. This is the best way to deal damage gradually while keeping a safe distance to dodge the sand tornadoes he launches.
If you have the chance, take advantage of the few moments when he lands to deliver sword strikes. Overall, the fight doesn’t have many surprises once you learn his movement pattern in this phase, but it can drag on if you struggle to recover energy, especially since the boss keeps moving almost constantly, and his tornadoes can be quite bothersome.
Regardless, after defeating Togryf, Tri will level up in power, and you will now be able to create replicas from a distance by holding Y. You will also receive 5 pieces of powerilio and, as usual, you can collect a new heart container before leaving the dungeon.
Related posts:
 How to reach the chest behind the wall in Gerudo Sanctum Dungeon in Zelda Echoes of Wisdom
 Zelda Echoes of Wisdom Gerudo Sanctum Dungeon walkthrough
 Sudelia Ruins at 100% in The Legend of Zelda: Echoes of Wisdom
 How many hours is The Legend of Zelda Echoes of Wisdom?
 Frequently Asked Questions in The Legend of Zelda: Echoes of Wisdom
 The mystery of the breaches in The Legend of Zelda: Echoes of Wisdom
 Escape from Hyrule Castle in The Legend of Zelda: Echoes of Wisdom
 The cave gap in The Legend of Zelda: Echoes of Wisdom
 The Ruins Breach in The Legend of Zelda: Echoes of Wisdom
 The Southern Gap in The Legend of Zelda: Echoes of Wisdom
 How to solve the Crypt of Uhrma puzzle in Star Wars Jedi Survivor
 Best Echoes to get early in Zelda Echoes of Wisdom


Post Comment